What Are The Backup Types In SQL Server

What Are The Backup Types In SQL Server

Backup is considered one of the biggest criteria in disaster recovery plans and strategy. Being a DBA, it is very important to take care of the database with backups all in place. A SQL Server database becomes complete with the data files, filegroups, and log files. Further, these files are inclusive of both user and system databases. Understanding the database backups can help us in better planning of disaster recovery strategy.

Let’s check a simple overview of backup types in SQL Server.

1. Full Backup

This is the most common backup type in SQL Server. A full backup pushes all the data and objects in the data files for a given database. The objects are nothing but the tables, views, procedures, functions, triggers, indexes, etc.

While other backups are little toiling to restore, the full backup becomes one of the simplest restoration processes. This is due to a single .bak file that comprises all the data including the log transactions.

2. Differential Backup

This is the second common backup that a DBA thinks of. A differential backup pushes all the data and objects for a given database that are modified since the last full backup. So basically, it means that the data modified after the recent full backup can rationally be smaller in size. However, the size of the differential backup is hypothetical and can vary depending on the number of changes done after the last full backup.

The differential backup file where the data is pushed is the .bak same as the full backup but consists of an additional statement of WITH DIFFERENTIAL in the backup script. The advantage of having a combination of full backup and differential backup strategy can reduce the risk of data loss. Additionally, they can even reduce the size of the backup files. Restoring a differential backup will mandatorily require the last full backup which will be considered a base.

3. Transaction Log Backup

Transaction log backup is one such backup that a DBA understands to restore a backup for a point-in-time recovery. The transaction log backup pushes all the log records into the .LDFfile since the last log backup. This backup type works only when the database is set to “Full” or “Bulk-logged” recovery model.

Once a transaction log backup is created, the .LDF logical file will be ready for reuse. In the production environment, the log backups are taken periodically to ensure point-in-time recovery for databases.

4. Full File Backup

Full file backup pushes all the data and objects to the specified data files or filegroups. This backup type is basically used lesser when compared to the other three backups mentioned above. Full file backup becomes a useful option when your database is big and has a huge data file.

5. Differential File Backup

Differential file backup pushes all the data and objects to the specified data files or filegroups that have changed since the last full file backups. So, if you are considering a differential backup with a huge size, then a differential file backup can be created. However, the differential file backup is considered not relevant as they are mostly related to just one data file.

6. Partial Backup

Partial backup is a backup type that pushes a complete writable portion of the database but excludes any read-only files or filegroups. The option was first introduced in SQL Server 2005. Additionally, there are chances where we may have read-only filegroups in our databases. So, this option of partial backup can help take the backup by excluding all the read-only filegroups in the database.

The backup type works only for full or differential backups but doesn’t work for transaction log backups. While a filegroup is changed from Read-Only to Read-Write, the backup will be taken automatically in the next Partial backup. However, while a filegroup is changed from Read-Write to Read-Only, a new filegroup should be created.

7. Differential Partial Backup

Differential partial backup pushes all the data and objects that have changed since the last partial backup. The feature was added in SQL Server 2005 and was designed for databases where the filegroups are broken up. A restore of the differential partial backup requires the last full partial backup. Like the full and differential backup scenario, the differential partial backup is smaller in size when compared to the partial backup. Due to which, the differential partial backups are always faster.

8. COPY ONLY Backup


A COPY ONLY backup is a backup type that works for either full or differential backup. The backup type with COPY ONLY option is designed to avoid any disruption to backup sequence for the respective database. Additionally, the backup option was introduced in SQL Server 2005. Therefore, the hassle of backup sequence disruption can be avoided using the COPY ONLY backup option. This scenario can be helpful when there are multiple Adhoc backups happening on a given database and the actual sequence is being interrupted.

What Is HADR_SYNC_COMMIT Wait Type In SQL Server

The HADR_SYNC_COMMIT wait type is a wait type that is commonly seen if your servers are configured with an AlwayOn recovery model. Further, the HADR_SYNC_COMMIT wait type was introduced in SQL Server 2012. If you have already worked on the Database Mirroring recovery model, then the wait type DBMIRROR_SEND in the database mirroring is relatively similar to as that of the HADR_SYNC_COMMIT wait type.

What is the HADR_SYNC_COMMIT Wait Type?

Before we start, one thing to get cleared is that, in AlwaysOn High-Availability, the transaction hit on a primary server first gets committed on the secondary and only then comes back to commit on primary.

HADR SYNC COMMIT Wait Type 1

The HADR_SYNC_COMMIT wait type represents the time taken by the secondary replica to acknowledge the harden log records to the primary replica. As soon as a transaction is started in the primary replica, the HADR_SYNC_COMMIT wait type starts. Once it starts, the transaction is moved to the secondary replica for hardening into the log. The HADR_SYNC_COMMIT wait time will only end when the secondary replica acknowledges that the transaction was committed on the secondary replica. This scenario happens when the AlwaysOn Availability Group is set to synchronous mode.

In a production environment, it is normal to experience HADR_SYNC_COMMIT wait type on your AlwaysOn Availability Group setup.

Reasons for HADR_SYNC_COMMIT Wait Types:

1. Intermittent network connection between primary and secondary replica.
2. 
Performance issues on storage subsystem on a secondary replica.
3. 
High log queue being transferred from primary to the secondary replica.

How to check a wait type with HADR_SYNC_COMMIT

SELECT *
FROM sys.dm_os_wait_stats
WHERE wait_type = 'HADR_SYNC_COMMIT'

From the code above, it is easy for you to figure out the wait types we see on primary as well as the secondary replica. I ran the above code on my primary replica and got the results as below:

HADR SYNC COMMIT Wait Type


From the figures, you may notice the waiting_tasks_count and wait_time_ms. Both columns represent the number of commands and the wait time respectively taken to commit on secondary and acknowledge on the primary.

How to check the average wait time using this data: 

HADR SYNC COMMIT Wait Type 3
From our gathered data, I am calculating the average wait time. Here, we may notice that the average wait time calculated is 8 ms which is a decent value.

HADR SYNC COMMIT Wait Type 4


Fix/Analysis: How to lower the HADR_SYNC_COMMIT wait type?

1. Change the Synchronous mode to Asynchronous mode of your secondary replica (this can completely remove the HADR_SYNC_COMMIT wait type)
2. 
Analyze the log send size, log send rate, redo queue size, redo rate, and mainly synchronization performance from AlwaysOn Availability Group dashboard.

Connect to your server à Expand “Always On High Availablity” à Right-click on your Availability Group à Click on “Show Dashboard” à Right-click on any column and view information

HADR SYNC COMMIT Wait Type 5

3. Troubleshoot using the DMV – sys.dm_hadr_database_replica_stats. This contains most of the information related to AlwaysOn. Additionally, you can check for other DMV too related to AlwaysOn. All of them start with a prefix as dm_hadr.
4. 
 Add counters on Availability Replica and check for performance-related issues trapped there.
5. 
Optimize your query (this is one of the foremost options to recommend to fellow DBAs and Database developers)

Conclusion

As the HADR_SYNC_COMMIT wait type is purely related to the performance of the secondary replica, it is always recommended checking the secondary replica initially. Try to optimize the query, lower the network intermittency, and avoid overload to the server to lower the wait type.

Note: In the production environment, it is recommended not to constantly switch between the synchronous and asynchronous mode. This could lead to data loss on disaster recovery situations. In case of emergence, perform the switch to Asynchronous, however, get them back to synchronous as early as possible. 

You also refer: "LCK_XXX Wait Types"

How To Clear IntelliSense Cache In SQL Server

While I was working with one of my DBA friends, we got into a topic wherein the SSMS was giving the “invalid object name” error even though the instance was correctly selected. Suddenly, the fix just ran into my mind. The error related to the database context can be due to the unrefreshed IntelliSense Cache. The IntelliSense Cache is not automatically refreshed in SQL Server. It is important to refresh the IntelliSense Cache manually.

The red underline of the database object that you have created may sometime freak you though you are connected to the correct database. This confusion is illustrated in a simple manner with a simple fix to clear the IntelliSense Cache.

Demonstration of a similar situation of the red line on the object names.

Step 1: Created a table as “Day” in one of my databases

Step 2: Dropped the table “Day”

Step 3: Trying to re-create the table with same name as “Day”. 

Clear IntelliSense Cache SQL Server

From the image, if you note that the object name shows a red underline with the tag as the object name already exists. This is purely the issue related to the IntelliSense Cache

To check IntelliSense Cache enabled or not in your SSMS.

Step 1: Click on “Query” option from Top Taskbar.  

Step 2: Check if the “IntelliSense Enable” option is highlighted as shown in the image. If the option is highlighted, which means the feature is enabled. 

Clear IntelliSense Cache SQL Server 2


Let’s check how to refresh the IntelliSense Cache manually. 

FIX 1: Through keyboard commands

Simply press Ctrl + Shift + R on your keyboard

FIX 2: Through GUI

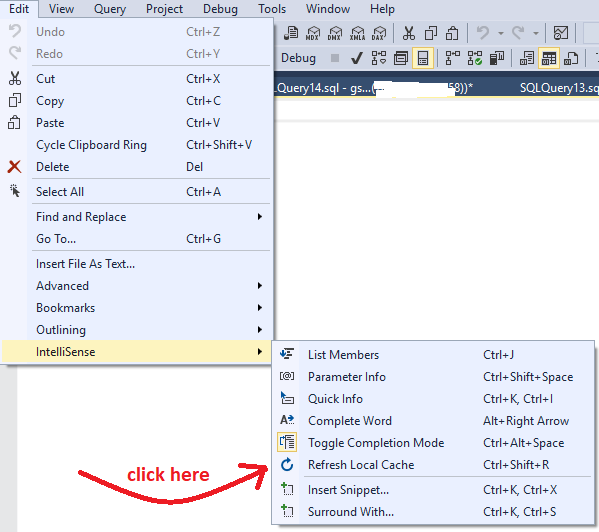
From top menus bar, click on “Edit” à “IntelliSense” à “Refresh Local Cache”

Clear IntelliSense Cache SQL Server 3


How To Fix Invalid Object Name - Database Context - In SQL Server

 Well, this becomes the most used and seen error in SQL Server if you are working as a database developer or a DBA. Additionally, most of you must already be aware of the situation of how to react when you see the error as “Invalid object name”. But there are places where some of you may get hung on what next when you see the error.

The fix for the error – Invalid object name, due to database context is pretty straight forward. Most of the users who explore SQL Server initially will come to use the GUI more than using the script itself.

Here, there are chances that you might have opened a new instance that selects the master database by default but fetching the records of your desired kind. So, the user may just think of havoc in this situation.

For demonstration purposes, I have created a table as [testing] and trying to run in master. So, we are obvious here that we are going to get the error as – invalid object name, as we are in the wrong database. 

Fix Invalid Object Name SQL Server 1

Fix:

Immediately I changed the database name to the database where my table exists, the error is gone. 

Fix Invalid Object Name Database Context SQL Server 2

Always make sure to check the database context while opening a new database instance as they tend to open the master database by default. 

If the issue still persists, then it could be due to IntelliSense Cache not refreshed. Please click here for a fix.

For your reference: How To Fix - Invalid Object Name - String_Split 

How To Compress A Native Backup In SQL Server

 The compressions of backups in SQL Server is purely to improve the performance of the server itself. The idea behind a backup compression is to reduce the disc usage in your drive. I was working with one of my friends who is a recent explorer in SQL Server and wanted to gather information on backup compression. It would be a good time to fabricate the native backup to all my SQL friends.

The native backup compression feature has been in use right since the SQL Server start-point. However, the compression was available only in the Enterprise Edition of SQL Server 2008 or earlier. If you are using any of the SQL Server 2008 or older version, then the backup compression is going to work only on Enterprise Edition. Further, the backup compression feature is made available starting from SQL Server 2008 R2.

The usage of native backups in SQL Server is still optional and can be performed using a third-party too. While comparing the performance of the native backup with the third-party tool, the third-party tool performs much better.

However, let’s check on how to compress a native backup in SQL Server using GUI.

Step 1: Open the SSMS and Right-Click on your server.

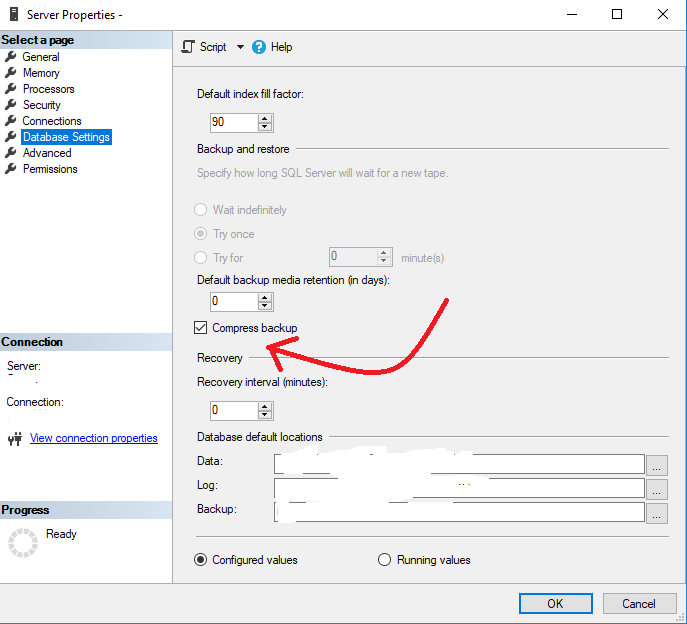
Step 2: Navigate to Database Setting and check the Compress backup option

Compress Native Backup SQL Server 1

You are all set with enabling the native backups with compression. 

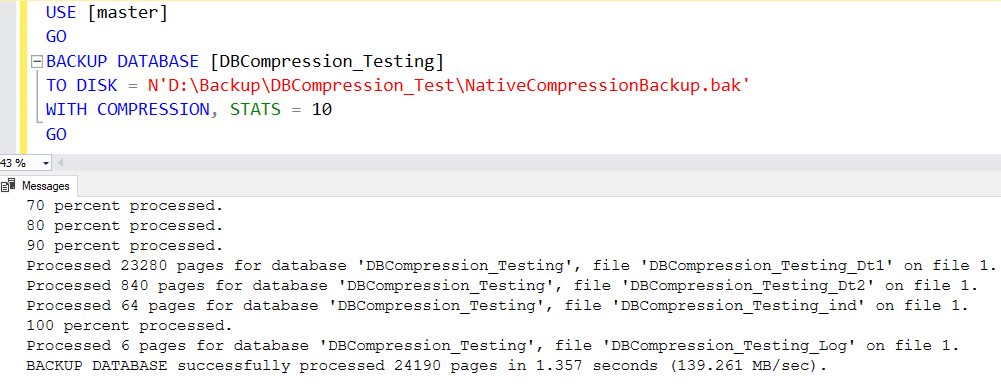
Once we are done with enabling the native backup compression option using GUI, we have another method to perform backup compression through the script. 

USE [master]
GO
BACKUP DATABASE [DBCompression_Testing]
TO DISK = N'D:\Backup\DBCompression_Test\NativeCompressionBackup.bak'
WITH COMPRESSION, STATS = 10
GO


Compress Native Backup In SQL Server 2

Using the script is simpler and more efficient than using the GUI. So personally, I prefer to run the backup through scripts than using GUI. However, both options are well enough to use.

For your reference:

How to create a full backup
How to create a differential backup
How to create a log backup

7 Simple Performance Tuning Tips And Tricks In SQL Server

Simple Performance Tuning Tips and Tricks SQL Server

We all come across a lot of applications in our life. Also, there are a lot of places we admire at the application performances as well. The main factor for any application to perform at blazing speed would be to improve the database performance in the first place. Database plays a vital role in application performance. If the front-end is well-developed but the database is sluggish, then the whole effort of development would go for a toss. In such cases, performance tuning comes to the picture. Additionally, while we are increasing the performance of a query, we should start with the basic and simple steps. Always it’s the best practice to check the simple and the simplest of the tuning before even stepping into the advanced indexing strategy.

While I have worked on many queries to improve the performance with some of my junior folks, the first intent they get is adding up an index. To be honest, adding an index can degrade the performance. However, I will be sharing performance tuning for indexes in the future.

Further, through my course of improving queries, I felt that these 7 simple tips and tricks can help to a greater extent. Let’s check the 7 performance tuning tips and tricks for our SQL Server database that can probably avoid problems.

1. Avoid SELECT * FROM

The SELECT * FROM is a sin in SQL while considering the performance. It is going to be definitely a bad thing if you are seriously working on developing a full-fledged application for a high-traffic interface. The SELECT * FROM is a Hitman for SQL Optimizer. There is no chance for the SQL Optimizer to choose the underlying indexes for a SELECT * statement.

Area of Tuning: 

Try to SELECT the column names needed for the data retrieval. This is going to help avoid disk, network, and memory contention on your server.

2. Caching In Application

If your application is randomly hit by multiple users across the globe and the data retrieval is happening directly from the server, then it is a bad idea. Every time a user retrieves the data from the database, there is going to be a huge amount of disk rotation and network contention. Additionally, this phenomenon can cause the server to go slow eventually.

Area of Tuning: 

Encouraging to cache in the application memory, to avoid constant queries to the database. This caching method can be implemented on infrequent updates and small sets of data such as lookup values.

3. Keep Transactions Short

This happens in many industries wherein the queries are Adhoc. These Adhoc queries could be to fix the application problems such as data retrieval and other reporting strategies. Basically, some of the reporting queries can run so long that the entire server’s CPU is eaten up. In fact, this is going to ruin the entire server’s performance. 

Area of Tuning: 

Try to shorten the query execution time and keep them simple. Longer queries are going to take way long locking on tables. The higher locking, the more the next user waits for accessing the table. Along with the lock waits, there could be a spike in CPU usage if the transactions are running for a longtime. Use a precise locking strategy to overcome blocking in SQL.

4. Avoid NOLOCK Hint

It is very general for most of the DBAs working on SQL environment to use the NOLOCK hint on big tables on a production server to avoid blocking. Usage of NOLOCK hint breaks the fundamental rules of data integrity. Additionally, using the NOLOCK hint can lead to missing or extra rows in data sets, which is a huge abuse to SQL. 

Area of Tuning: 

We have an alternate version to deal with the NOLOCK hint introduced by Microsoft, a snapshot isolation level. Using the command such as READ_COMMITTED_SNAPSHOT isolation level on top of any of your queries can simply solve most of the SQL overhead problems. Further, this can as well solve the missing or extra rows in data sets.

5. Use Variable And Parameter Data Types Same As Columns

This can be something interesting for people on how the data type slow the performance of a query. While I was testing the data import on a stored procedure on one of my optimization projects, there seemed a mismatch in data type between the declared variable and the columns. When the data is imported from a variable to a column with different data types, there is going to conversions happening. This can hit the SQL optimizer to a greater extent.

Area of Tuning: 

Try to keep both the variable/parameter data types with respect to columns always the same. This can help avoid table scans and as well void the cause of data conversions.

6. Avoid Usage Of DISTINCT, ORDER BY Or UNION Unnecessarily

It becomes very common for us to eliminate the duplicates using the DISTINCT function. A DISTINCT can be a killer for SQL. Additionally, the ORDER BY is going to sort your query, and internally optimizer is thinking of more logical ways to do that. This in turn of sorting your query will be a time taking job. Further, the UNION is one simple way to combine results. The usage of UNION can just slog the server over time. 

Area of Tuning:

DISTINCT: Instead of using the DISTINCT function, try with GROUP BY clause at the end of your query to eliminate duplicates. The reason for this changeover is simple and clear that the SQL is going to do a bit of more job internally if used as DISTINCT. This can be viewed in a precise manner while using the DISTINCT on big queries. 

ORDER BY: Now it's going to be your call on either to use a GROUP or BETWEEN operator to get the range. The logic on your query should be optimal enough to make the SQL feel much better.

UNION: Please refer to the Advantagesof UNION ALL Over UNION for your solution of replacement.

7. Minimize CURSOR and WHILE LOOP Usage

CURSORs and WHILE LOOPs usage may be one of the Database developers or DBA’s personal choice. But as per my research on the CURSORs and WHILE LOOPs, the performance was degrading over time. This is because the CURSOR and WHILE LOOP go with row by row basis and it is time-consuming task. If you are developing your application that needs a faster result and are working on CURSOR and WHILE LOOP basis, then it’s a bad idea.

Note: Usage of CURSOR/WHILE LOOP can be seen with good performance on small data sets. 

Area of Tuning: 

Try to use the sp_msforeachdb system stored procedure. The sp_msforeachdb is commonly avoided by some junior folks. This is because it becomes a tedious job to go with the internal coding of sp_msforeachdb stored procedure. But, please check in the long run of your application and it would be much appreciated.


Unable To KILL SPID Using WITH STATUSONLY In SQL Server

KILL is one of the common commands that we from the database side work on a regular basis. It would be obvious thinking for some of the SQL users to come up with a statement as “KILL using WITH STATUSONLY is not killing the session”.

The WITH STATUSONLY by the name is going to show us the status of the session ID passed along with the KILL command. Additionally, the status will be shown for the corresponding session ID only when your session is in the rollback status.

For example, just imagine that you killed an ALTER

Let’s check a simple example of killing a session WITH STATUSONLY

I have created a table and imported bulk records into a table as “Kill_test”. After inserting the records into the “Kill_test” table, I will be selecting the data as:

SELECT * FROM Kill_test

While the data is being selected, simultaneously I will be running the KILL WITH STATUSONLY command as below. In my case, the session ID is 110.

KILL

In this case, we may notice error as mentioned below.

KILL WITH STATUSONLY

This happens because the KILL (spid) WITH STATUSONLY in our case was a SELECT command. 

The WITH STATUSONLY gathers and shows status of the session only when the session is in the rollback state.

Fix and Bottomline:

If you feel that your session is not being killed using the WITH STATUSONLY command, then it’s a misconception of killing the session ID. Please use the KILL (spid) alone to finish the job.

KILL (spid)

Example:

You may also refer: "How to kill a SPID in SQL Server"

For your testing purposes

Please try to create a clustered index on a heap table (which doesn’t consist of a clustered index) consisting of a huge number of records. Before performing this action, please make sure to run the following in the development environment. After a minute of execution time, kill the session. The killed session would be in the KILLED/ROLLBACK state. Now, once again run the KILL (spid) WITH STATUSONLY to check the current status of the killed session.


The Business Intelligence Semantic Model In SQL Server

The Business Intelligence Semantic Model In SQL Server

The Business Intelligence Semantic Model is the latest model created by Microsoft that supports all the applications in BI stacks. Additionally, the intent of such a model is to provide efficient, rich, and scalable analytical capabilities. The important highlight of the BISM model is its integration of data from heterogeneous data sources like LOB applications, relational databases, and unconventional sources like cloud, Excel, or text files. Further, the BISM comes with a three-layer architecture: the data model, business logic and queries, and data access

Data Model:

Now, it’s the choice of the developers or analysts working in BISM architecture to choose either a multidimensional data model or a tabular one. Additionally, the integration of the model can also be in an Analytical Services server or PowerPivot.

Business Logic and Queries:

Yet another choice for the analysts and developers to choose between the Multidimensional Expressions (MDX) and Data Analysis Expressions (DAX).

MDX – The MDX is based on the multidimensional concepts that are like query language for online analytical processing (OLAP). Further, the OLAP uses a database management system. And the language can also be used for calculation purposes like spreadsheet formulas.

DAX – The DAX is based on the tabular concepts which are a native query language for Microsoft PowerPivot, Power BI and SQL Server Analytical Services (SSAS). Some of the similar formulas used in the Excel is as well used in the DAX for formulating purposes. The purpose of DAX is to facilitate with simple, reliable and flexible feature while encroaching the PowerPivot and SSAS tabular models.

Data Access Layer:

The data access layer merges the data from multiple data sources such as relational databases like the DW, files line of business (LOB) applications. The data can be either server locally or can be passthrough directly from the data sources. Further, serving locally is called the “Cached mode” and passthrough is called the “pass-through mode”.

Cached Mode: The cached mode can use either of the two storage engines. One that comes with the MOLAP that supports the multidimensional model and the other latest engine is “VertiPaq”.

Pass-through Mode: By the name just accept the data without saving the data from the data source. However, the ROLAP and DirectQuery is the complementing model to the cached mode counterpart. 

Interview questions you may be interested:

"Difference Between Clustered Index And Non-Clustered Index In SQL Server"

"Difference Between Shared Lock, Exclusive Lock And Update Lock In SQL Sever"

Using Dynamic Pivot Tables In SQL Server

PIVOT relational operator is one of the best features that the SQL Server consists of. PIVOT revolves around a table consisting of unique values into multiple columns. A lot of reporting companies, Data Warehouse and analytical consultancies use the PIVOT for their industrial purposes. A simple pivot just rotates the table value to multiple columns. However, if we need the values for pivot column to be automated, then dynamic PIVOT is the best option for us.

We are going to learn about using the dynamic pivot in our SQL tables.

In my example, I am going to create a table and insert the values about the list of table fragmentations. Let’s check the steps on performing a dynamic PIVOT.

Step 1: Inserted 10 random of my database fragmentation records into #1 temp table

select * from #1


Step 2: Implementing a dynamic PIVOT on #1 temp table

We are going to pivot on [date] field column, taking into account the max function on (fragmentation) column.

DECLARE @Pivot_Column [nvarchar](max); 
DECLARE @Query [nvarchar](max); 
SELECT @Pivot_Column= COALESCE(@Pivot_Column+',','')+ QUOTENAME(date) FROM 
(SELECT DISTINCT [date] FROM #1 )Tab
SELECT @Query='SELECT TableName,DatabaseName, '+@Pivot_Column+'FROM  
(SELECT TableName, [date] , DatabaseName,Fragmentation  FROM #1   )Tab1 
PIVOT 
( 
MAX(Fragmentation) FOR [date] IN ('+@Pivot_Column+')) AS Tab2 
ORDER BY Tab2.TableName' 
EXEC   (@Query)

Ordering Dynamic PIVOT column

Currently, I have just one data in my temptable for all 10 records. But, imagine if you need to dynamically PIVOT for multiple date field columns and they should be in an ordered manner. Then, the order by clause should be added to the PIVOT parameter as shown in the code below.

DECLARE @Pivot_Column [nvarchar](max); 
DECLARE @Query [nvarchar](max); 
SELECT @Pivot_Column= COALESCE(@Pivot_Column+',','')+ QUOTENAME(date) FROM 
(SELECT DISTINCT [date] FROM #1 )Tab Order By date
SELECT @Query='SELECT TableName,DatabaseName, '+@Pivot_Column+'FROM  
(SELECT TableName, [date] , DatabaseName,Fragmentation  FROM #1   )Tab1 
PIVOT 
( 
MAX(Fragmentation) FOR [date] IN ('+@Pivot_Column+')) AS Tab2 
ORDER BY Tab2.TableName' 
EXEC   (@Query)

Find Last Update Statistics Date In SQL Server

I was working on a query to improve the performance and I happened to find the Update Statistics on the table outdated. Update Statistics play an important role in query performance. If you are a DBA or a database developer, the update statistics is one common term you keep listening to every day. Additionally, one fantastic feature we have in SQL Server is the jobs. We can always have the Update Statistics updated by scheduling jobs.

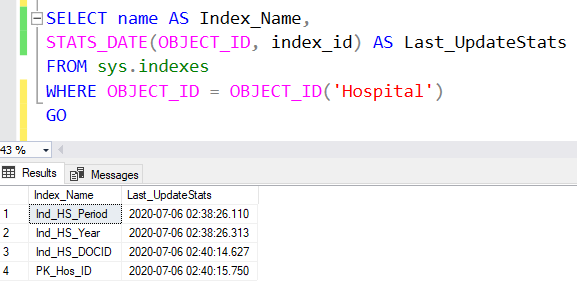
Today, we will be checking the last updated statistics date using the system view - sys.indexes. Before checking the last updated statistics date, let’s check the indexes we have on the desired table.

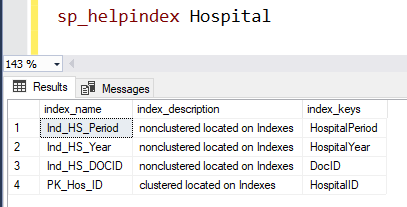
I have created a dummy table as “Hospital”. I will be checking the indexes on that table with the below command.

sp_helpindex Hospital

Last Update Statistics SQL Server 1

Once you have the list of indexes from the sp_helpindex command for your information, let’s check the last updates statistics date with the below query.

SELECT name AS Index_Name,
STATS_DATE(OBJECT_ID, index_id) AS Last_UpdateStats
FROM sys.indexes
WHERE OBJECT_ID = OBJECT_ID('your table name')


Last Update Statistics SQL Server 2


NOTE: If you have created a new table and notice NULL values in the date field, then the SQL Server never created a statistic blob on your table. The statistic blobs are not created for new tables, empty tables, or filtered statistics. Due to these reasons, the results can go NULL for you and the predicate does not return any rows as results. 

If any of your statistics do not match the indexes of your table, then they appear in the sys.stats instead sys.indexes.

SELECT Stats_ID, [name] AS Stats_Name,
STATS_DATE(object_id, stats_id) AS [Stats_Date] 
FROM sys.stats
WHERE s.object_id = OBJECT_ID('your table name');  


Compare Columns Of Two Tables In SQL Server

I was working on a project to check and compare columns of a table with another table to make sure the structure was the same. While we DBAs work regularly on multiple databases, we have a general tendency to use sp_help system procedure or directly use ALT + F1 keys to check the table structure. But if we must check the table structure of multiple tables manually, then such methods should be ruled out.

I have a quick script to help you with comparing columns of two tables using information_schema (System Information Schema Views).

A simple format to compare columns of two tables:

SELECT
db_name() AS DBNAME,
c2.table_name,
c2.COLUMN_NAME
FROM [INFORMATION_SCHEMA].[COLUMNS] c2
WHERE table_name = 'table1'
AND c2.COLUMN_NAME NOT IN
( SELECT column_name
FROM [INFORMATION_SCHEMA].[COLUMNS]
WHERE table_name = 'table2'
)


Example:

In my example, I have created two tables as test1 and test2. 

Table structure - test1  looks like:

Compare Columns Two Tables SQL Server 1


Table structure - test2  looks like:

Compare Columns Two Tables SQL Server 2


Now, let's just the query to check the mismatch between the two tables and its output.

SELECT
db_name() AS DBNAME,
c2.table_name,
c2.COLUMN_NAME
FROM [INFORMATION_SCHEMA].[COLUMNS] c2
WHERE table_name = 'test1'
AND c2.COLUMN_NAME NOT IN
( SELECT column_name
FROM [INFORMATION_SCHEMA].[COLUMNS]
WHERE table_name = 'test2'
)

Compare Columns Two Tables SQL Server 3


The above result gives us the missing column in test2 when compared with the test1 table.